m (Created page with "{{PuzzleNav|Jars and Cans 1|A Rickety Bridge}} {{PuzzleInfobox |name={{PAGENAME}} |image=File:DB099.png |imagewidth=256 |game=DB |number=099 |location=Grocery Store |solvedby...") |
m (yeah, my internet's pretty much dead right now. bye.) |
||
| Line 11: | Line 11: | ||
|obligatory=No |
|obligatory=No |
||
|picarats=30 |
|picarats=30 |
||
| − | |reward=[[Hamster (Minigame)|Trampoline]] |
+ | |reward=[[Hamster (Minigame)|Trampoline]]}} |
| + | |||
| − | }} |
||
'''{{PAGENAME}}''' is a puzzle in ''[[Professor Layton and the Diabolical Box]]''.<br /> |
'''{{PAGENAME}}''' is a puzzle in ''[[Professor Layton and the Diabolical Box]]''.<br /> |
||
==Puzzle== |
==Puzzle== |
||
| Line 24: | Line 24: | ||
|3=Here's another piece of fun trivia. |
|3=Here's another piece of fun trivia. |
||
<br /> |
<br /> |
||
| − | As stated in Hint Two, these puzzles are referred to as Mandarin duck puzzles, because of the affectionate behavior Mandarin duck couples exhibit toward each other. But it turns out that these birds are said to change mates every year. |
+ | As stated in Hint Two, these puzzles are referred to as Mandarin duck puzzles, because of the affectionate behavior Mandarin duck couples exhibit toward each other. But it turns out that these birds are said to change mates every year.}} |
==Solution== |
==Solution== |
||
| Line 33: | Line 33: | ||
<gallery type="slideshow" position="center" hideaddbutton="true"> |
<gallery type="slideshow" position="center" hideaddbutton="true"> |
||
| − | + | DB099.png|Initial Position |
|
| − | + | DB099S1.png|Move the second and third containers into the empty area. |
|
| − | + | DB099S2.png|Move the third and fourth containers into the empty area. |
|
| − | + | DB099S3.png|Move the sixth and seventh containers into the empty area. |
|
DBcorrectscreen.gif|Move the first and second containers into the empty area. |
DBcorrectscreen.gif|Move the first and second containers into the empty area. |
||
</gallery> |
</gallery> |
||
| Line 42: | Line 42: | ||
==Trivia== |
==Trivia== |
||
*[[Garland]] is seen in the backround of this puzzle. |
*[[Garland]] is seen in the backround of this puzzle. |
||
| + | |||
{{PuzzleIndex2}} |
{{PuzzleIndex2}} |
||
{{DEFAULTSORT:{{PAGENAME}}}} |
{{DEFAULTSORT:{{PAGENAME}}}} |
||
Revision as of 18:52, 6 June 2011
| ← | Jars and Cans 1 | Jars and Cans 2 | A Rickety Bridge | → |
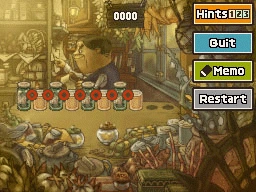
Jars and Cans 2 is a puzzle in Professor Layton and the Diabolical Box.
Puzzle
Look at that, another row of jars and cans all mixed up, and this time there are even more of them. As before, your job is to rearrange these items so that both jars and cans are grouped with items of the same type. However, in doing so, you must always move two containers at once.
Move items around by touching the red icon between two containers and dragging the selected pair of items around with your stylus.
Hints
Solution
Correct
Well done!
This puzzle can be solved in as few as four moves and is based off one widely known in Japan since the Edo era.


Trivia
- Garland is seen in the backround of this puzzle.
| Puzzles in Professor Layton and the Diabolical Box | ||
|---|---|---|
| Normal |
|  |
| Weekly | See here for weekly puzzles. | |
| Hidden Door | ||
| Puzzle Index: CV · DB · UF · LS · MM · AL · VS | ||